Machining Mic Bodies?

GroupDIY Audio Forum

Help Support GroupDIY Audio Forum:

This site may earn a commission from merchant affiliate links, including eBay, Amazon, and others.

thenovice

Well-known member
Joined
Nov 24, 2004
Messages
96
Location
Minneapolis,MN
I hope this question isn't in-appropriate for the drawing board?

But If I wanted to go about getting a microphone body machined from a design sketch I drew, would I ....

Have to have it modeled in a cad software or something or other first?

I don't want to look like a fool calling and asking these questions, so I figured I'd ask a friendlier bunch prior! lol!
 
just my .02 but unless its intricate design it can probably be done easier on a manual lathe. you can do radiuses, ect on a manual lathe as well.

if you want a tapered body like a u87 where the inside and out tapered then expect to spend a chuck of money. finding tube with thick enough wall to machine that out of will be hard, and to start from solid stock, if you were doing aluminum you'd be looking at a 100$+ for the metal alone. and thats alot of metal removal. so hundreds+ for the shell itself.

touchy subject to diy. thats why you usually see c12 style straight tube bodies. other ones are usually cast i belive.

have you seen what people charge for custom 1 off CNC work? it can be insane.
sometimes the setup time for the machine for a project is longer than the actual milling time. thats why 1 off's can be so expensive.

throw up your sketch if you want and i might can point some stuff out that might not be the best machining idea.

once again, .02.

taylor
 
s5700.jpg


I was thinking something along the lines of this "Feilo OEM' since i doubt I could actually acquire one unbadged from the source?

I've been up all night toying with the idea of learning to operate a mill or lathe, buying a small one and seeing what I can come up with? [well it's an 'doown the road' idea anyways, and a iffy one too]

my sketch is pretty similar to the pic, minus a few different rings & engraving ideas I had.

straight body, non-tapered. [I do not like that look at all.]

I haven't really looked into the prices actually. [throw out a number?]
An acquatance of mine founded a local "scrap metal corp" im sure if worse came to worse I could persuade him to get one of his employees to maybe do it?
 
this tube shape can be done in most machine shops, clear drawing is needed but it's does not have to be cad (if neede for cnc the workshop can draw it from sketch).

body's like the 87 are made by metal streching or casting .
 
that body design is pretty simple.

but keep in mind how the head and endcap will attach. they will need to be threaded, which is time intensive process which equals $. and the head is mutiple cuts, finishing, unless you do it yourself.

heres a body you could start off with:

http://img3.musiciansfriend.com/dbase/pics/products/4/3/1/245431.jpg

http://www.musiciansfriend.com/product/MXL-MXL-992-LargeDiaphragm-Condenser-Microphone?sku=273162

130$ is a working mic, with cap, case, shockmount, ect.

if you didnt like the lettering, you could epoxy the whole body to fill in the engraving, sand, and paint over any color you want. would look pretty sharp.

taylor
 
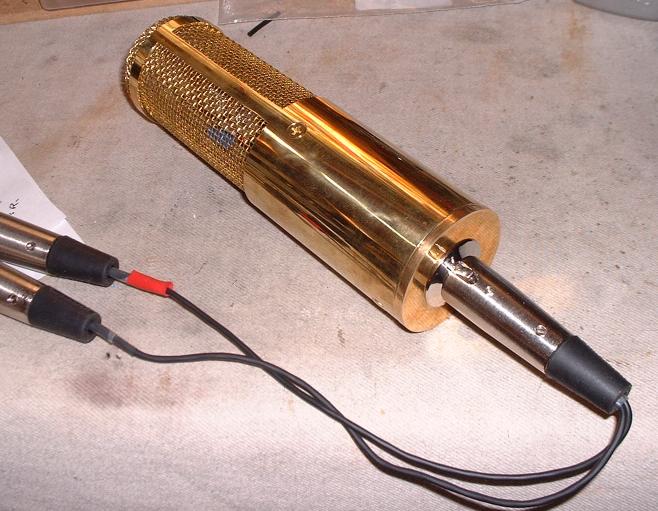
The microphone on the right is a body that I made on a Harbor Freight 9X20 lathe. There were two things that were difficult for me (a novice machinist). The first was threading the outside of the XLR barrel because I wanted it to screw into a stand adapter. The other part was cutting the rectangular holes in the cylinder that supports the screen mesh. This needed to be done with a milling machine and a rotary table (set 90 degrees to the end mill). I have subsequently figured out a few ways to simplify the design. This one took about 12-15 hours to machine (again, by a total novice).

gcm_family_1.jpg
 
You can do a pretty nice mic body with tavern "bar railing" parts from McMaster-Carr. It's nice brass, there's an endcap which can be drilled out to hold an XLR. I've done several mic bodies with just a drill press and a Dremel tool.

Earl-prototype-3.jpg
 
@ asm yep i've been pondering doing exactly that to a mxl mic.
not 100% on that idea yet though.

@burdij looks good! any other tips or pics? what did you read or what got you started with milling?

@Scodiddly that looks good as well, do you happen to have the part numbers for the stock you used? [or the stock measurements?] was the wire mesh used for the grill one complete unit or was the top part seperate from the sides?

I think I could fool around with either [stock or a mxl body]
on a lathe and maybe put some cool grooves into it?

thank you guys a lot , = inspiration!
 
Look at the meta you will find some answers.

Google things like army machine manuals etc..........

I have built a microphone body from a piece of fence post. Power supplies in an electrical box. Machined bodies and parts. Built a body from Al sheet. I still use a hacksaw drill and file for cutting the tube microphones grill areas.

When in a store I often look at stuff and think about could that make a microphone body? or....

Round microphones, How boring
 
if you want a tapered body like a u87 where the inside and out tapered then expect to spend a chuck of money

Or, if possible, look into the brass shells of artillery grenades - some of them has a good taper for mics:

http://julia.hanovercomputer.com/firearms/mar05/catalog/images%5C53555-69.jpg

Jakob E.
 
[quote author="thenovice"]Scodiddly that looks good as well, do you happen to have the part numbers for the stock you used? [or the stock measurements?] was the wire mesh used for the grill one complete unit or was the top part seperate from the sides?[/quote]

http://www.mcmaster.com
2113T69 - 4 foot length of 2" brass tubing, $40.42
2113T57 - 2" brass end cap, $6.32

If you're only figuring on making one mic, you could try to find a place that installs bar fixtures and see if they've got cut-off scraps.

The wire mesh grill is done in two pieces, a tube soldered to a cap, with all the seams hidden behind ribs. Photo of similar windscreen from a much smaller mic:
http://scotthelmke.com/Alice-kit/Windscreen/dscf0053.jpg
 
You can buy brass railing in shorter lengths which should be a lot less... I got mine in a 1-foot length at 'brassfinders' and probably the exact same end-cap... I'd have to be at work to look up the exact part numbers I used, but you should be able to find it online in ten minutes or so... let me know if you want me to dig out the info...

Keith
 
No, these strips were cut from a sheet of brass, rounded with a file, bent around the tube and then the ends were soldered together. The head basket is attatched using allen screws in the body that are backed out into blind holes in the head basket.
 
[quote author="tragikremix"]hey,

the guys gave you excellent ideas already, but if you want a CAD rendering, i could probably draft it up for you. do you have a sketch or something?[/quote]

thanks
but i think i have everything under conrol from this point on.
bit of research of my own.
and a few of these guys inspired me.

i guess we shall see in due time how things turn out.
 
Hello everybody... I´m just going to do a pair of G7 Mics

I already bought a Aluminum Tube and made two nice looking Mic bodys out of it... now I read here, that aluminum has some issues when used as a mic Body...

What exactly is the problem with it? One guy in another Forum wrote, that there is a Problem with defending the circuit from elektronic fields.... I thought about to solve this problem with a sheet copper inside of the aluminum tube....

What about this "ringing" issue you wrote about?
Actually the capsule is not really surrounded by the aluminum tube... only the small stripes that are holding the grill.

Shound I throw them away and look for a brass tube?

Thanx Jonas
 
To protect a cap from electromagnetic fields and that the cap did not work, as the receiver radiowaves, it is necessary to use a grid with the minimal size of a cell, or two grid-one in another. And copper it, aluminium or steel, does not play a greater role, only for convenience of soldering. I use a steel grid.
The main thing that you had a good screen between a cap and the scheme.
 
Back
Top