POLL : Waterslide transfer paper or the Safmat method ?

GroupDIY Audio Forum

Help Support GroupDIY Audio Forum:

This site may earn a commission from merchant affiliate links, including eBay, Amazon, and others.

Which method do you prefer ?

  • Water slide decal paper

    Votes: 0 0.0%
  • Safmat

    Votes: 0 0.0%

  • Total voters
    0
  • Poll closed .

vertiges

Well-known member
Joined
Oct 25, 2007
Messages
766
Location
Montreal, Canada
Hi all,

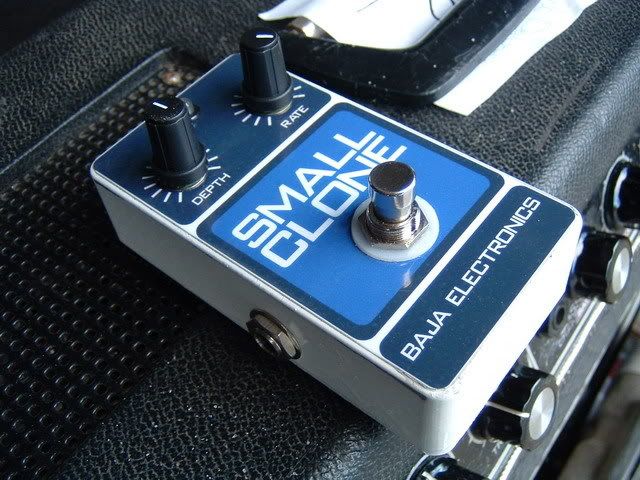
I would like to share my experience...

I've tried the two methods :

1) With waterslide decal paper, you have to print your design on it and after that, you have to apply a few coats of Krylon for basicaly protecting the printing against the water. So the film begins to be thick and it's long because you have to wait 15 minutes between the coats.

2) With the Safmat : you have to print your design on it and when the ink is dry, the self-adhesive film is ready to use. The film is very thin.

The problems I had with the Safmat methods are :

a) The film is a little darker (more grey ?) than the colour under it.
b) It's quite hard to get rid of all the air under without damaging it.
c) It's hard to position the "little squares" of films.

With the waterslide decal paper, my conclusions are :

a) It's maybe more visible because more thick and the texture (looks like irregular platic when you look very closely) of the film is not as well finished as the Safmat BUT the film is exactely the same colour than the colour under it !
b) When you position the "little pieces" you've cut, it's so easy !!! As long as they are still wet, you are able to re-position them !
c) Less expensive !

Which one do you prefer and why ?

eD)))
 
never tried the Safmat....but I use the waterslide decals on my guitar pegheads....looks great and easy to apply. I've have not tried it on a front panel (and I don't think I ever will because I don't like the look of clear coat on a panel) for me it's Front Panel Express or silkscreen :wink:
Freddy
 
[quote author="Freddy G"] for me it's Front Panel Express or silkscreen :wink:
Freddy[/quote]

Hey... Hello Mr Snob !!! :grin:

(I'm kidding... :wink: )

Actually, I don't like the Front Panel Express ones... Too perfect !
I prefer when nothing is aligned... :wink:


eD)))
 
vertiges said:
[quote author="Freddy G"]
Actually, I don't like the Front Panel Express ones... Too perfect !
I prefer when nothing is aligned... :wink:

If it looks too perfect, no one will believe you made it. :wink:

I've never used the Safmat - but after reading your descriptions above, it looks like waterslide is a better option. Plus, which sounds more fun? A waterslide or a safmat? (ask your kids.)

After my last front panel, I decided it's worth the patience to add many thin coats of clear coating. After the first two coats, I got lazy and sprayed it on thick. The wind from an open garage door blew ripples into the surface and it hardened like a frozen lake on a windy day (with mini waves in the surface.) So now my front panel is permanently pock-marked. Just a tip to consider during the endless thin coat process.
 
[quote author="kato"]
If it looks too perfect, no one will believe you made it. :wink:
[/quote]

That's right ! :wink:

[quote author="kato"]
After my last front panel, I decided it's worth the patience to add many thin coats of clear coating. After the first two coats, I got lazy and sprayed it on thick. The wind from an open garage door blew ripples into the surface and it hardened like a frozen lake on a windy day (with mini waves in the surface.) So now my front panel is permanently pock-marked. Just a tip to consider during the endless thin coat process.[/quote]

Yes, those kind of things can happen... when you are not patient or when the wind blows. :green:
It's better to apply 10 thin coats than 3 thick ones !

eD)))
 
Anyone here doing dye sublimation? I just read about it yesterday.

Apparently, an inkjet printer is used on some special paper... then heat applied to transfer the ink from the paper to the material.

I was impressed with sample photos of full-color images transferred to aluminum (non-anodized, i.e. natural color), tiles, etc.

But I have not seen samples where fine text or line art is transferred... so maybe it's only good for photographs/images or big logos???

+1 on several thin coats to seal the decal. Move back 2 ft or so and spray lightly... then let dry and come back again. The finish will also not be glossy, but matted.
 
[quote author="SSLtech"]How about the "third option" of Super-77, reverse laser-printing and krylon clear to cover it all...?
Keith[/quote]

I've heard about "your" method. :wink:
I haven't tried yet...

eD)))
 
[quote author="owel"]Anyone here doing dye sublimation? I just read about it yesterday.

Apparently, an inkjet printer is used on some special paper... then heat applied to transfer the ink from the paper to the material.

I was impressed with sample photos of full-color images transferred to aluminum (non-anodized, i.e. natural color), tiles, etc.

But I have not seen samples where fine text or line art is transferred... so maybe it's only good for photographs/images or big logos???
[/quote]

Wow it seems interesting !!! :shock:
Have you got a link ?

eD)))
 
I can't remember the exact links, I visited different pages... I just googled "dye sublimation".. there's a ton of sites.
 
If you use Lazertran waterslide paper with the design printed on a laser printer, you do not have to coat the decal with laquer.....

Ink jet inks are water soluble but laser inks are not. This is the method I have used for most of my front panels & I have never had to worry about the extra process.

With the cost of colour lasers having come down a helluva lot, this might be an easy way to go. I only ever had a B/W laser printer.

If you are using the ink jet process, here is a tip. I once bought a can of ink jet "fixative" spray, similar to what draughtsmen & architects use to protect drawings. This only needed one or two coats to protect the decal, my memory is a bit fuzzy on this though. I cant remember what the can was called as I have not done an ink jet label for many years now, but I bought it from an art supply shop.
 
That reminds me of an interesting label I saw over at free stompboxes. It's just an inkjet printout, laminated, from this post.

Good for stompboxes and maybe other things, the finished job looks like this:
DSCF0003s.jpg


Hi Mike A
I use Duplicolor white spray can lacquer paint - 3 thin coats, but for production models I get them white powdercoated, because it is a far more durable finish.
For the label - I print it on my printer using coated photo type inkjet paper (epson), then I laminate it with a cheap home A4 hot laminator.
Then I trim the label and attach it to the case with Nitto double sided adhesive tape. ( you could use a suitable tube glue if unable to find the Nitto)
A craft knife and round file are used for the switch, led, and potentiometer mounting holes.
cheers
bajaman
 
[quote author="peterc"]If you use Lazertran waterslide paper with the design printed on a laser printer, you do not have to coat the decal with laquer.....

Ink jet inks are water soluble but laser inks are not. This is the method I have used for most of my front panels & I have never had to worry about the extra process.

With the cost of colour lasers having come down a helluva lot, this might be an easy way to go. I only ever had a B/W laser printer.
[/quote]

Thanks for the info Peter, but unfortunately, the Lazertran is so hard to find in Canada ! :cry:
BTW, if someone has found a supplyer in Canada, please let me now.
Is the Lazertran REALLY transparent ?

[quote author="peterc"]
If you are using the ink jet process, here is a tip. I once bought a can of ink jet "fixative" spray, similar to what draughtsmen & architects use to protect drawings. This only needed one or two coats to protect the decal, my memory is a bit fuzzy on this though. I cant remember what the can was called as I have not done an ink jet label for many years now, but I bought it from an art supply shop.[/quote]

I should maybe try that... It must be easy to find.

Thanks,

eD
 
I tried the inkjet Lazertran and just could not get it to work right. The clear portion would always cloud up when I sprayed it with the Urethane. Maybe it was the brand I was using, but it was completely frustrating. Everything else looked really good. So I pretty much wasted $40 experimenting with that stuff.

What has worked best for me has been matte photo paper sprayed in clear coat and spray-glued on. The trick is getting the right amount of glue so it doesn't ooze out of the edges and so that there's enough to keep the edge of the paper from peeling.
 
[quote author="vertiges"]

Thanks for the info Peter, but unfortunately, the Lazertran is so hard to find in Canada ! :cry:
BTW, if someone has found a supplyer in Canada, please let me now.
Is the Lazertran REALLY transparent ?
[/quote]

It's mostly transparent. Not like glass or air - but almost.

Here's a link for
Lazertran suppliers in Canada
(I realize it may not be helpful.)
 
I've been using lazertran whenever I need color in my frontpanel - but for quick black&white jobs I've used the Super 77 method twice very successfully.

Here's a mini-stompbox. You can see I sprayed the super77 a little too thick. It made a nubby surface - but it looks intentional, and still good:

front.jpg

top.jpg


I've also got a front panel (no pictures) for the green pre where I did super 77 without the spray. I printed toner onto CD label backing paper and then ironed the toner onto the front panel. Not sure why it worked but it did. I'll post some pictures of that after I take some.
 
I've used all three myself and here are my experiences and comments. I won't cover engraving or silkscreen since all that takes is writing a check:

For the most part for all of them you need to be very cognizant of text versus panel scales and markings. You cannot have white text on a black front panel with any of these methods. You can however design the panel such that the text is clear and will show through a printed black area. The issue is that you will have large areas of printed black and as you will see this is a real pain in the a*s using some of these methods.

There are no printers that will print white (for all practical purposes) I know there are production systems but were talking about a TYPICAL home users printer. Most printers look at white as the absence of color so it will be clear instead of white. For anybody doing this for the first time it is best to go with a light colored front panel instead of a black one unless you have access to or want to print in color ( I have no interest ). And that means, color, (red, yellow etc...) not white. I did not realize this would be such a huge issue when I first started. I wanted a black background with white text and scales but after spending months trying the labeling I caved and painted my black front panel silver. I got around it by doing large black pads with clear text that came through the silver background. Once you get there here is what I found regarding the methods. Specifically, I used an HP laserjet B&W to print everything.

Super 77: This is quick and easy if all your doing is just adding labels: "IN" "OUT" "ATTACK" "GAIN"; basic marking and such. Since my dual 1176 had large areas of black (pads) because I wanted light lettering showing through black there was just no way. I could never get the black areas fully black. Infact when printing the design onto the sticker paper or photo paper most of the time half of it would fall off before I could even get it to the front panel! I tried all kinds of different papers and backings and finally just decided that my design was too complex for the method. They were always blotchy areas and missing pieces in the large black areas and I ended up spending over a month starting over and over again trying to get it right. I finally gave up. However I did use it to label a little 1u ditty with some basic controls and it worked fabulous. Looks good too.

Lasertran: This stuff is just too thick. I didn't like the way it stood up off the panel. Now there are two ways to use this and some use it by printing the image mirrored and then applying the decal backward (face down) and removing all the backing glue (which is now on top) Once it's attached they put it in the oven at 400degF. I tried this too for many weeks and basically got the same thing as the Super 77 problem. Blotchy wherever there were large areas of black. If you use just as a normal decal it works it's just really thick and you can see it up off the panel. I think it might work for many but I found that because once I've lettered the panel I then drill my holes the decals were torn off the front panel by the drill bit and I had to redo the whole thing. Probably best to use a mock up printed out on shelf paper of clear sticker, drill holes, then label. I found that in general the decal even after spraying with lacquer wanted to lift at the edges.

Safamat: I think this stuff works really well and it is now my preferred method. It's very thin, works just like a bumper sticker but it's 10x thinner. It is difficult to get things lined up but it's worth spending the time doing it. Once you've got it stuck down, use a rigid piece of foam or rubber to rub it down into the front panel really well. Here is a trick: right after you've printed it out (on laser) put it in the oven for a few minutes or under a heat gun until you just see the print glaze over. This really helped a lot for the large black areas. It takes experience but you just want to slightly melt the toner. I had no problems with lifting just as long as your careful. Looks great. Very close to silk screen. But the key is to finish it by spraying with matte lacquer. This was the finishing touch. It just disappears into the panel. Totally pro. You can of course feel a lip at the edge IF you really feel for it but I have to say that the majority would never notice.

My $.02. Hope this helps others

Ken-
 
Back
Top