POLL : Waterslide transfer paper or the Safmat method ?

GroupDIY Audio Forum

Help Support GroupDIY Audio Forum:

This site may earn a commission from merchant affiliate links, including eBay, Amazon, and others.

Which method do you prefer ?

  • Water slide decal paper

    Votes: 0 0.0%
  • Safmat

    Votes: 0 0.0%

  • Total voters
    0
  • Poll closed .
[quote author="kato"]Here's a mini-stompbox. You can see I sprayed the super77 a little too thick. It made a nubby surface - but it looks intentional, and still good:
[/quote]

Thank you ! Pics are better than 1000 words !

[quote author="kenrinc"]
Once you've got it stuck down, use a rigid piece of foam or rubber to rub it down into the front panel really well. Here is a trick: right after you've printed it out (on laser) put it in the oven for a few minutes or under a heat gun until you just see the print glaze over. This really helped a lot for the large black areas. It takes experience but you just want to slightly melt the toner. I had no problems with lifting just as long as your careful. Looks great. Very close to silk screen. But the key is to finish it by spraying with matte lacquer. This was the finishing touch. It just disappears into the panel. Totally pro. You can of course feel a lip at the edge IF you really feel for it but I have to say that the majority would never notice.
[/quote]

Waow :shock: !!!
Thank you Ken, very interesting :thumb:
Have got any pics ?

eD)))
 
IMG_6839opt.jpg


For the 1U GSSL, I've used traditional waterslide transfer paper.
For the 3U GSSL, I've used the Safmat.

The Safmat is a very little bit darker and as you can see, the aligment has been painful :oops:

And the ink didn't stick very wel. (I used an inkjet printer)

eD)))
 
I used waterslide for my G9
closeupchan1.jpg

but I specifically chose a very light color so the decals wouldn't show as much. It looks good enough for my purposes.
By vertiges pics, the waterslide looks to be the winner.
 
I have only used Safmat, and I laminated the whole panel with it. This way you can´t see the laminate at all (unless you know about it and look really close!). I don´t understand why you cut it out into pieces? I think it´s much easier to design/align it in the computer and then just print it out.

But, make sure you get it right the first time because the glue is superstrong! I don´t think this stuff will ever peel off.

I have some more pics here.

gssl_025.jpg


gssl_030.jpg
 
Nice panels everyone.

full panel
Like KlangKraft, I also do the full panel instead of "little squares" that have to be positioned. The only problem is, for a 19" panel, you have to do 2 sections which leaves a visible seam in the middle. I've tried 'butting' the two sections (visible seam) and overlapping the two (visible seam.)

Klang, do you get a seam? Perhaps the Safmat is thin enough that it's less visible.

the thinness
It sounds like Safmat is just like lazertran - only thinner. Lazertran is already so thin that it tears sometimes when I'm positioning. I have to be very careful not to tear it when getting the bubbles out.

Can you get Safmat in the U.S.?
It seems to be a european thing. Blick sells it in a "digital tone" manga kit. I wonder if Letraset has rebranded it for different markets. (description mentions 'safmat.'

Question: Can you also heat Safmat in an oven to affix it permanently to the panel?

heatgun for lazertran too
Ken mentioned blotchiness in large printed black areas with lazertran. Melting it in an oven or with a heatgun helps it stick just like with the safmat. The instructions that came with my lazertran recommended it. I always do it but I've wondered if it really matters or not.

tip: burnish your lazertran after baking with steel wool
This only works with the full sheet method obviously.

eD, you mentioned the texture: "looks like irregular plastic when you look very closely"
At the very end, instead of spraying with clear coat to get a glossy finish, you can instead use 0000 steel wool to get a matte finish. Hard to believe I know, but a gentle polishing will take the irregular bumps off and won't harm the artwork underneath at all.

oh yeah, another tip: drill your holes before you do the artwork or paint. Less worries about messing up your perfect finish.
 
OK , here are my thoughts..


Lazertran will be crap , unless it is cooked as per instructions...at a certain temperature it changes state and becomes more transparent...this happens well before 200deg btw..

However, if you are trying to use it on top of a paint job , it is unfortunately all too easy to go just a step too far where paint will bubble...and then u r ruined...

SO...

On Bare Aluminium : Lazertran ( lazer) slide it on , position ...let it dry gently , in the sun perhaps ...keep going back ..get thse bubbles out...

then leave 'til tomorrow...
In the morning do the cooking process , SLOWLY raising temp as per.

You will have a perfectly flat lazertran job...no bubbles etc..


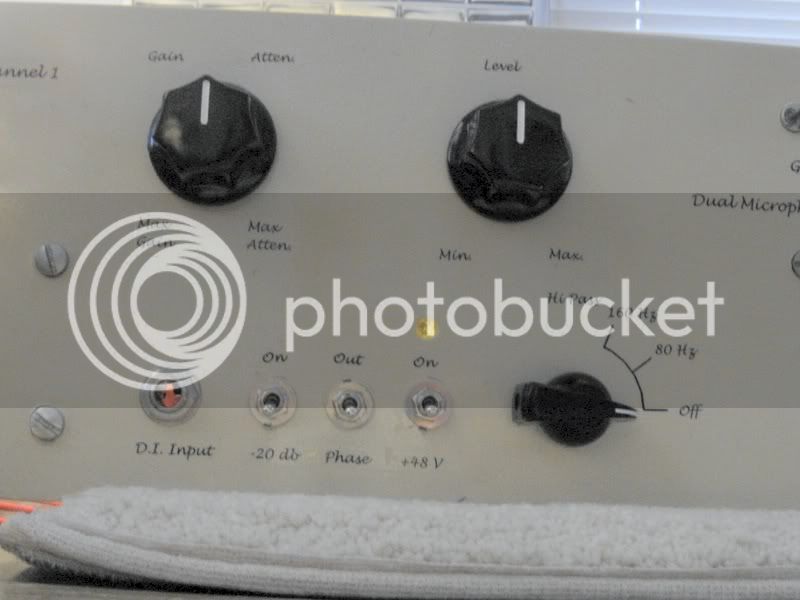
On a Painted Panel
Lazertran Ink Jet paper , but printed with LAZER printer ... apply to panel as per instructions... this time the 'ink' (toner on our case) is on the surface ...so we need to clear coat. This is also by far the best method if large black areas are involved. I don't have a pic just now , but the result looks extremely like KENRIC's safmat job. Far better than lazer'lazertran' in this respect..

In general withh these film methods on paint, I'll back up the opinion that it's best to cover the whole panel..

And ,of course, usink the Inkjet paper variety means no cooking...

With Inkjet Lazertran you will have no bubble problems...but as you clear coat the toner layer , with certain brands , you must finely mist the first few coats , from not too close a distance , or the solvents will attack the toner...this is the only place to be extra careful..


SSLTech's Super 77 method
I loved the idea of this , and had a frustrating time trying to get it to work...

(For anyone in the uk ...Super 77 is avaialable at PRIORY FRAMING SUPPLIES)

Like many people...the main problem I had was getting the toner to print on the backing sheet...It would always come out of the printer looking like someone had blown all the toner off , with only a few small areas printed..

I was trying different types of paper I had lying around,and different print settings..but always the same...until i had this breakthrough:

At one point , instead of continuing to waste fresh paper , I took a dry lint free cloth and wiped the toner off the backing sheet ..kinda scrubbed it clean , to re use , so i could try another print setting.... and whoa!!...this time it came out PERFECT!
At first i thought the success was due to the new print setting , and so I repeated with a fresh piece of paper...but then it came out crap again!

So what had i done....rubbed the paper!

The best label paper for this method seems to be the sort that has a waxy backing sheet , where it is almost difficult to tell which side the labels were adhered to...Some label paper is like ordinary paper , on the reverse of the backing sheet(the side you DONT use)...and that doesn't seem to work so well , for me anyway..

So..with the waxy paper....peel off enough labels to give yourself a useable sheet , then on a flat bench , under a nice bench light rub the glossy surface in single long strokes...you will see the gloss turn into a very fine powder. Keep brushing this gently away, till your backing sheet is clean.....NOW try printing on this! It should be absolutely perfect!!

A nice trick to use when you are playing around with all of this , is to use the sticky side of the labels you have discarded as 'practice panels'....Its an easy way to check the characteristic of the backing sheet you are using...You may have a perfect print , but it may not all transfer off ...so you find a print setting to match..("thin paper")..

The rest of the method is documented elsewhere in detail , but I'd only add that placing a blank backing sheet across the transferred graphic and rubbing down , allows you to evenly burnish the glue evenly over the panel , before drying/clearcoating....this really flattens the glue down to invisibility!

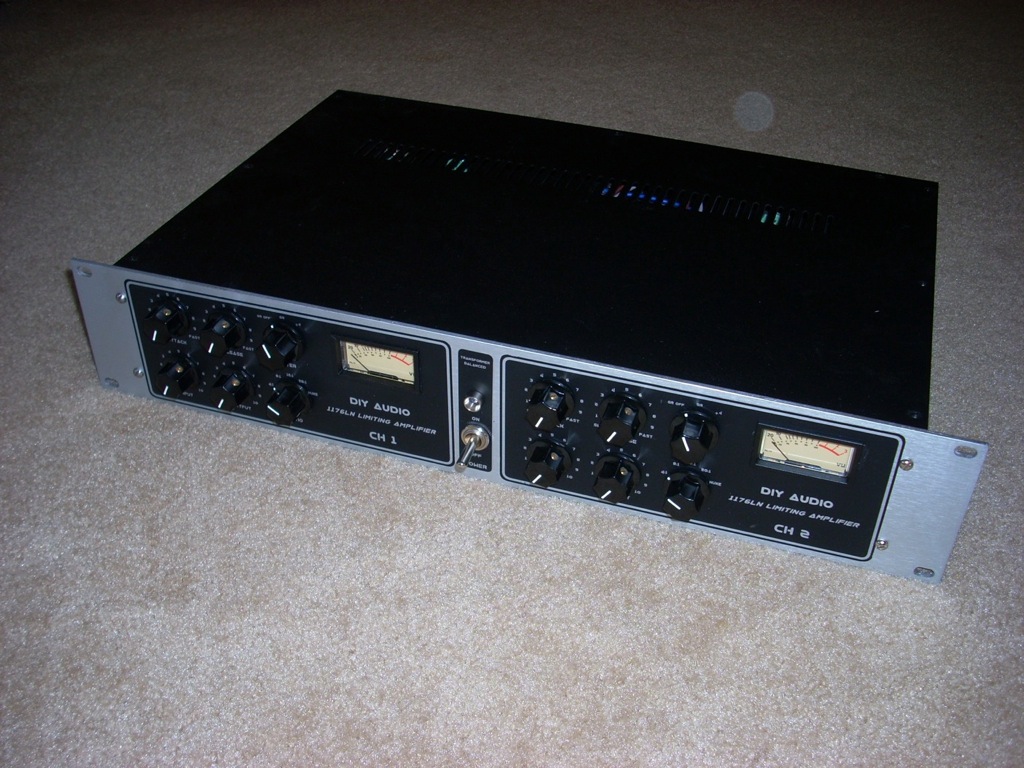
Thanks to SSL Keef , I have finally achieved what I have wanted since starting DIY ...which is simply toner print onto a paint job.


Etching
Don't forget you can etch a front panel...double strength ferric chloride ...use the Iron on photo paper method here as a mask...it's more 'plastic'y and a good resistant....or spray photo resist , but you probably don't have a big enough light box anyway ! Well...I don't ....and you can fill with any colours u like ...I do this for alll my rear panels where I want a more hard wearing surface, where plugs are going in and out all the time...

You can get etching pretty close in spirit , to engraving ...ok not the same precision...but you'll have it done within the hour and you have total freedom to try again , if anything goes wrong!


Cheers

nEon.
 
Yes, I do get at least one seam, but I think I´m the only one that can see it. Well, and maybe other DIY-heads :grin:
But if you have an A3 printer thats no problem since it´s sold in that format too. Safmat can be ordered from letraset.com directly. I paid with visa and had it in the mail 3 days later!

I printed a guideline 1mm "outside" the panel to help align the film correctly. Also, if you use inkjet, give the film a light spray of clearcoat before burnishing it down. Otherwise the ink will easily smear.

This super77 method looks promising. Thanks for all the info :thumb:
 
Regarding Safmat: I gues it's Safmat and not Safamat. :razz: My bad.

I tried laminating the whole panel using one long section. I can't say that there is anything wrong with that just that I think it depends on your design. For some reason I didn't want the mid seam. Once the panel is coated with matte lacquer the stuff just disappears for our purposes. That "bubbled" plastic look just goes away and melds everything into one consistent panel. I have not tried this with separate pieces stuck all over so I can't vouch for that. As you can see there were only 3 total pieces on my 1176 (L side, power strip, R side)

You do have to make sure the panel is absolutely surgically clean though because any spec of dust or other matter will cause you problems. If you do run into it though you can slightly slice through the bump with a knife, remove the matter and then burnish. It is very difficult to see (especially after matte spray).

---------------------

It sounds like Safmat is just like lazertran - only thinner.

Lazertran is essentially a water slide decal. Safmat is a sticker with adhesive backing (like a bumper sticker) In addition, you can use Lasertran in a quasi toner transfer method by applying the decal upside down (image side down and mirrored). You then put the whole panel in the oven and the toner transfers to the panel directly (actually melts into it). You then pull off or scrub off the plastic backing.

When used as a water slide decal, it tends to dry brittle if you don't have everything burnished down well. It's easier to position but I didn't think it was worth it in the end. Didn't like the brittleness of the decal once it dried.

Can you get Safmat in the U.S.?
Safamat in the US is purchased directly from Letreset:
http://www.letraset.com/design/shopdisplayproducts.asp?id=1130&cat=Safmat

Can you also heat Safmat in an oven to affix it permanently to the panel?


No. Safmat is a thin sticker and since you can't print on the sticky side there is no way to actually get the design onto the panel. BUT you can use heat to your advantage by slightly melting your design onto the paper before you apply it to your panel. Print onto Safmat with laser then heat to bond toner. If you have large black areas this works really really well but it takes experience to judge how much heat. I used an open oven on high and just held it over the coils until you see the toner slightly gloss over.

Ken mentioned blotchiness in large printed black areas with lazertran. Melting it in an oven or with a heatgun helps it stick just like with the safmat.

Doesn't matter when your using it as a decal although it won't hurt. If your using it as a toner transfer you have no choice, that's the only way it will bond to the panel.

Another tip: drill your holes before you do the artwork or paint. Less worries about messing up your perfect finish.

Totally agree. But make sure they are accurate because it really sucks when you apply your layout and the holes are off (doh!).

neon: Thanks for the tip on the Super 77. I will actually try that because the one advantage that that method has is that it's almost totally free and the materials can be purchased locally.

Looks good guys. Finally a useful thread on panel labeling !

Ken
 
I can't seem to find a detailed description of the super 77 method. can someone describe it to me? Thanks.
 
I couldn't find Keef's original post but I saved a copy in my inbox. Here is what I have:

Keef wrote:

It’s my own method of transferring

Clean the panel with lighter fluid (Naphtha).

Gently mist a light covering of 3M Super 77 spray (about $8 at Office Depot for a can that will do a hundred panels!)

Get a few pages of Laser Labels and peel the labels off. throw the labels away and print your panel design reversed- onto the backing.

You have about 30 minutes working time with the super 77. Leave it 3 minutes to go tacky, then place your printed designs onto the panel, smooth them down so that they stay in place and finally rub the markings on with a pencil. (Not too sharp or it can go through the paper!)

Peel off the backing, making sure that the design transferred on. Leave the Super 77 about an hour to dry (in a dust-free area!!!) then start misting a few light coats of clear lacquer (I used Krylon) as a protective coating, to make sure that the design doesn’t easily chip off.

The results speak for themselves!


It looks great to me!!!
 
So the purpose of the label paper is to get the waxy backing to transfer the ink? This sounds cool, like using the press n' peel method for PC boards.
Thanks for the description.
 
So the purpose of the label paper is to get the waxy backing to transfer the ink?

Yes....but not for 'INK'...we use TONER!

And if you can't get it to print...try rubbing the gloss off , as I described earlier!

nEon
 
hello,

where can I find this backing paper ? sorry, but my english is not so good and I don't understand what it is.. :oops:

thanks
 
Nadège,

Sorry for the French... Belgian solidarity ! :green:

Le "backing paper", c'est ce qu'il y a à l'endos des autocollants, des étiquettes, de certains papier photos...
Ça ressemble un peu à du papier ciré.

Keith l'a découvert en mettant des étiquettes Avery dans le mauvais sens dans son imprimante. Au lieu d'imprimer sur la partie imprimable, il a imprimé sur le verso... Il a remarqué qu'en frottant un peu l'encre se détachait super facilement...

J'espère que je suis clair... :wink:
Sinon, je pourrais poster une photo lundi.

eD)))
 
[quote author="peterc"]
If you are using the ink jet process, here is a tip. I once bought a can of ink jet "fixative" spray, similar to what draughtsmen & architects use to protect drawings. This only needed one or two coats to protect the decal, my memory is a bit fuzzy on this though. I cant remember what the can was called as I have not done an ink jet label for many years now, but I bought it from an art supply shop.[/quote]

Your memory is serving you just fine. The spray is called fixative. Artists also use it to permanent their charcoal drarings, and it can be found just about anywhere art supplies are sold.
 
[quote author="Klangkraft"] I don´t understand why you cut it out into pieces? I think it´s much easier to design/align it in the computer and then just print it out.


I have some more pics here.

gssl_025.jpg


gssl_030.jpg
[/quote]

How did you get the Safmat to cover the whole panel?Even A3 usable size is 420mm and the rack length (19") is more than that
 
[quote author="dshay"][quote author="peterc"]
If you are using the ink jet process, here is a tip. I once bought a can of ink jet "fixative" spray, similar to what draughtsmen & architects use to protect drawings. This only needed one or two coats to protect the decal, my memory is a bit fuzzy on this though. I cant remember what the can was called as I have not done an ink jet label for many years now, but I bought it from an art supply shop.[/quote]

Your memory is serving you just fine. The spray is called fixative. Artists also use it to permanent their charcoal drarings, and it can be found just about anywhere art supplies are sold.[/quote]

I have to try that !!! Thanks for the tip ! :thumb:

[quote author="Klangkraft"] I don´t understand why you cut it out into pieces? I think it´s much easier to design/align it in the computer and then just print it out.[/quote]

I'll try the "one piece method" next time. Are you able to re-positionate the whole piece easily ?
BTW, I already knew you site. Nice job ! :thumb:

[quote author="codered"]How did you get the Safmat to cover the whole panel?Even A3 usable size is 420mm and the rack length (19") is more than that[/quote]

It seems to be in 3 pieces on the pic... :roll:

eD)))
 
Want another tip?

Cut the piece to your frontpanel size BEFORE you soak in water and remove the backing paper...

(I found out the hard way with my first attempt...)
 
[quote author="kato"]Want another tip?

Cut the piece to your frontpanel size BEFORE you soak in water and remove the backing[/quote]

That's what I did. Actually, I haven't thought to cut it after... :wink:

eD)))
 
Back
Top