MXL 603s... crappy capsule?

GroupDIY Audio Forum

Help Support GroupDIY Audio Forum:

This site may earn a commission from merchant affiliate links, including eBay, Amazon, and others.
When you say polystyrene, is that simular to Styroflex?
!STYROFL.jpg
 
As promised:

mxl603s_1.jpg


mxl603s_2.jpg


[quote author="Gus"]Like Marik posted change the input ceramic to a 1000pf polystyrene, the two .22uf to the output transistors to good films and the output RF caps .022ufs to .01uf good films.[/quote]

Which ones are these in the pics? Is the input ceramic the single small guy on the back side (the first picture)?
 
What about the pot? Any need to mess with it? how?

Also, would you care to post pictures of your modded 603 after the mod Tim? It would probably help a great deal to be able to see what result were after.

I'm really starting to think the mod would be a good idea, but since I like the mics already i want to make sure I don't screw them up. I definitely got a good pair.

Shane
 
[quote author="Category 5"]What about the pot? Any need to mess with it? how?[/quote]Only if you change the FET (and I wouldn't) - otherwise don't touch it!
[quote author="Category 5"]Also, would you care to post pictures of your modded 603 after the mod Tim? It would probably help a great deal to be able to see what result were after.[/quote] To be honest, it'll probably be a while before I have time to do this. But there's really no need as it's as simple as I stated above - just remove one cap and insall the other.
[quote author="Category 5"]
I'm really starting to think the mod would be a good idea, but since I like the mics already i want to make sure I don't screw them up.[/quote]Ahh, therein lies the hard part - not screwing them up! And removing the existing parts is where it will happen. If you don't have the proper tools or much de-soldering experience using cheap PCBs, then chances are you will lift pads and screw them up, so leave it to a pro. (Hint - you can always practice on old junk radios or something)

Also, check the bottom of Zebra's post: ""if you think it's expensive to hire a professional, wait until you hire an amateur!" Red Adair"

Sad, but true.
 
The traces on the 603 PCBs I have worked on will lift very easy. You might want to cut the cap off from the top side leaving some of the legs. I tech trick is to have the board held, then using pliers grab the leg on the topside and apply heat to the bottom. The leg will often pull out with no damage to the board, this work well with ICs that you don't want to save when you remove them from a PCB, cut the legs at the body and remove the legs like above.
 
Cat 5,
After re-reading my post today, I wanted to make sure I do not come across like I'm trying to discourage you from attempting this, but rather to keep you from messing up your board. You sound rather apprehensive and I was just trying to make the point that it does take a little skill. Gus offers some good advice. Practice on a junk board first and you'll do fine.

One more thing... Use a low temp iron/tip, if you have a choice as this will not cause the pads to lift as quickly.
 
[quote author="Flatpicker"]Cat 5,
After re-reading my post today, I wanted to make sure I do not come across like I'm trying to discourage you from attempting this, but rather to keep you from messing up your board. You sound rather apprehensive and I was just trying to make the point that it does take a little skill. Gus offers some good advice. Practice on a junk board first and you'll do fine.

One more thing... Use a low temp iron/tip, if you have a choice as this will not cause the pads to lift as quickly.[/quote]

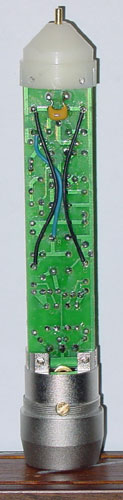
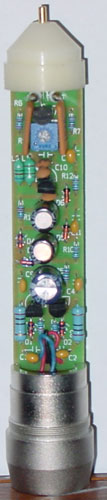
I understand Ti, and appreciate you looking out. I am not quite that much of an ameteur with building, as I am getting pretty good at soldering. I was planning on getting another 603 to do the royer tube mod on, so I will try the cap mod on the original circuit board before I take it out. The Royer mod completely replaces the board, so it won't be a loss if I screw up.

If it's easy enough, I'll do the matched pair with the new caps. You say it is a real noticable improvement? I was keeping an eye out for some KM84s to come available, but if the 603s get much better I can just live with them. I was really surprised at how good these mics sound.

I would probably just clip the old caps and remove the stems one at a time, then use a desoldering vacuum (the spring loaded kind with the button) or wick to remove solder from the holes.

Shouldn't be too hard I think. I have never lifted a pad yet, so I don't know how easy it is for that to happen.

Shane

Tim, got any music online I can hear that you made with your new mics? Some mandolin would be great too!
 
[quote author="Category 5"]...I would probably just clip the old caps and remove the stems one at a time, then use a desoldering vacuum (the spring loaded kind with the button) or wick to remove solder from the holes.
...Tim, got any music online I can hear that you made with your new mics? Some mandolin would be great too![/quote]If you can solder ok then it shouldn't be that big of a deal. I seem to have better luck with de-soldering braid (Solder-Wic) but again, don't hold heat on it any longer than you have to. If you use a vacuum, take the iron off the pad just before pushing the button. If you leave the iron on the joint while pressing the vacuum button, seems like it will lift the trace every time. Not sure why this happens.

I've only modified one of my matched pair, but didn't get a "before" and "after" clip. When I mod the second one, I'll do guitar and mandolin so you can clearly hear the improvement. Not sure when I'll get to it, though. I'm slammed for the next couple of weeks.
 
Someone on another forum mentioned that bypassing the DC/DC converter in this mic will lead to a clearer sound. Any comments on this? And if you recommend it... well.... how do you go about doing this?

Thanks for putting up all this detailed info guys, I'm going to be modding my stereo pair with new caps soon!
Also I should note that I've had trouble in the past getting these mics open. The screws in the body are HELLISHLY tight on mine. Jewler's screwdrivers didn't give me enough torque so I tried some different slightly larger screwdrivers, which didn't catch and pretty much flattened the heads of the screws :( Guess I'm drilling them out...
 
Someone on another forum mentioned that bypassing the DC/DC converter in this mic will lead to a clearer sound. Any comments on this? And if you recommend it... well.... how do you go about doing this?

It was me. I actually mentioned it in this very thread and probably once on HR. It is not only clears up the top, it also makes little better bass. But first, find good caps to fit.

Also I should note that I've had trouble in the past getting these mics open. The screws in the body are HELLISHLY tight on mine. Jewler's screwdrivers didn't give me enough torque so I tried some different slightly larger screwdrivers, which didn't catch and pretty much flattened the heads of the screws :( Guess I'm drilling them out...

I hope you were screwing them in, i.e clockwise.
 
I think it was Marik who mentioned that somewhere on this forum. I did this to a couple MXL 1006s I have. I did it because the DC converter in one of them was putting out about 4 volts less than the other and that mic had noticeably lower output. No big deal, but annoying to have to compensate for when using them as a stereo pair.
I just hooked two matched 100kOhm resistors to pins 2 & 3 and put a 10uF cap between the junction of the 2 resistors and ground bypassed by a .1uf poly for luck. This got me about 36.5 volts which gets connected to the 1gigOhm polarization resistor.
The downside is your phantom power has to be a well regulated 48volts or the output of the capsule will drop as the voltage goes down.
Worked well for me though; the mics are pretty well matched now.
 
[quote author="Gus"] and the output RF caps .022ufs to .01uf good films.[/quote]

Which ones are these in the picture I posted? The ones directly above the XLR?
 
[quote author="b3groover"][quote author="Gus"] and the output RF caps .022ufs to .01uf good films.[/quote]

Which ones are these in the picture I posted? The ones directly above the XLR?[/quote]

Yes,

In fact, if you don't have RF problems you could just take them off there.
 
Back
Top