U47-style bodies - who can make one?

GroupDIY Audio Forum

Help Support GroupDIY Audio Forum:

This site may earn a commission from merchant affiliate links, including eBay, Amazon, and others.
Hi Skylar,

My two cents:

I'd opt for Option A for the rails, soldering seems sturdier to me than epoxy. No offense, but epoxy (on a mic, anyway) to me seems like a kludge.  :'(

What was the reason for not doing the rings and rails as one assembly? Cost?

Regards,
Chris
 
fazeka said:
Hi Skylar,

My two cents:

I'd opt for Option A for the rails, soldering seems sturdier to me than epoxy. No offense, but epoxy (on a mic, anyway) to me seems like a kludge.  :'(

What was the reason for not doing the rings and rails as one assembly? Cost?

Regards,
Chris


Oh, I see...you're talking about Method A, Step 7, Option A.
I prefer soldering or welding also.


The one-piece headbasket presents some machining problems because of the internal ridges.
It would take a high-end machine to make, thus more expensive.
Most vendors will be incapable of machining it.


Here's a 3D PDF that demonstrates the tooling for Method B of the headbasket assembly process:
[dead link]


Skylar said:
That idea has come up in this thread before.
I decided not to use a groove (like the one you have shown) on either the top or bottom ring because the original was not done this way.
(The M147, however, has a groove on its bottom ring; whereas, the U47 has no groove on top or bottom.)

uh sorry i was wrong here. actually the m147 head is so strong and sturdy that i absorbed that detail into my drawing - without looking at dave´s inside-shot of the basket.
your assembly leaflet looks great.
edit:and the pdf above is even better  :eek:

 
Thanks!

If I were designing something from scratch, I would definitely use the groove method just as you have.
I don't think there's any question that it's a superior feature for ease of construction.

But, as I said, I have decided to keep the headbasket as true to the original as possible.
 
Hi Skylar!
First, let me congratulate you one more time for your awesome work!

Despite being from the start an advocate of the "groove" solution, I respect your choice, and doing it "the way it was made by Neumann" is certainly a quite valid argument.
But you wrote:"This may be a small detail, but I believe the resulting internal geometry of a grooved headbasket design will have a greater impact acoustically..."

So, if we are talking internal geometry, what do you think the lack of the original switch inside the headbasket will have, in terms of acoustical impact?

Axel


Attachments

  • 47switch.png
    47switch.png
    56.2 KB · Views: 97
mad.ax said:
So, if we are talking internal geometry, what do you think the lack of the original switch inside the headbasket will have, in terms of acoustical impact?

This question is for Skylar, but I can't resist offering an observation.

Perhaps the lack of a switch will result in an acoustic improvement.
 
I think every part (small or large) and its geometry & placement will have an effect on the acoustics.
I agree that the switch, metal contacts, spring, etc. all have an acoustical impact.

We could try to replicate all of those little parts, but then things get really complicated and expensive.

So, I just tried to replicate the parts that I feel will get things close without being too complex and costly.


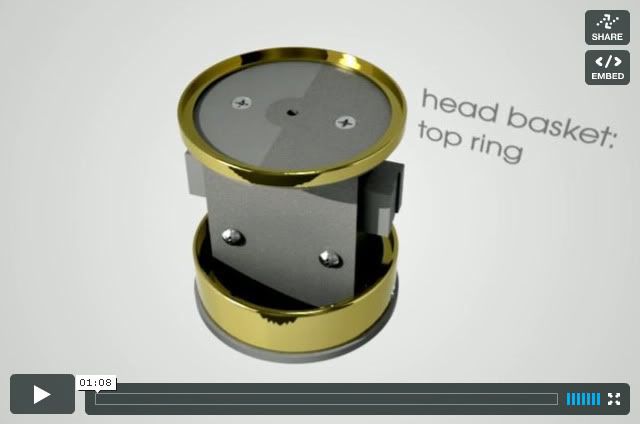
If you look at one of my prototypes on the left, you'll see
-a lack of pattern switch+spring mechanism, various metal contacts, and small screws.
-no notch for the pattern switch on my capsule disc
-the holes in the capsule disc are in different spots
-my proto has two screws that anchor into the inner rails


So, not a perfect copy, but the general geometry is all there.


The brass alloy that the mesh is made up of is, I think, a trivial detail.
It is critical to use the correct wire mesh specs, however (wire diameter, mpi, and %openness).
I definitely have a match on the wire mesh specs (I posted comparison photos somewhere in the labyrinth that is this thread).

I don't think that using a different brass alloy than what Neumann used for their wire mesh will make a difference sonically.
Furthermore, I do not think that the chemical composition of the nickel plating will impact the acoustics either.

Now, the thickness of the plating, on the other hand, could be important.
The best measurement that we have seen thus far for the thickness of the plating is .01mm, which is a standard plating thickness and what I have specified on my shop prints.

 
Skylar said:
I designed a fixture set this morning which I think will do the trick.
I will post some pictures in a sec.


Here's a video that demonstrates how this tooling would work.


EDIT: I removed the video due to intellectual property concerns.

 
You are some guy!

I think the secret of the U47 basket sound is mostly with the position of the capsule contra the upper ring or whats the proper word

Matti
 
excellent video Skylar, I cant believe how many questions you have been getting regarding this whole thing.... ??? me i am happy to be having an opportunity to be getting a few nice bodies and glad you have semi re-engineered a nice body. Thanks again for all the effort and time you will hopefully see the light at the end of the tunnel soon enough!
 
Skylar,

That video is pretty slick (and so is that jig)!

I'm having a hard time thinking which would be better: welding or soldering? I suppose it doesn't really matter.

Thanks for sharing the video, it was (as usual), superb!

Chris
 
Oh, very cool video. Do you do everything inside Solid works? or do you do animation in 3DS max??
I would like to do stuff like that..:)
j
 
Joechris said:
Oh, very cool video. Do you do everything inside Solid works? or do you do animation in 3DS max??
I would like to do stuff like that..:)
j

I do the CAD modeling in SolidWorks; the animation/render is in modo.
3DSMAX is too expensive!
 
Great work, Skylar!   :eek:

I´m mailing you a new bunch of (about 70) inside pics via sprend.com, this time of the matte version. Hopefully you can pick out some useful ones. PM me (or post in the thread) if you don't get them.

/Dave
 
Absolutely amazing... This level of thought, quality, and care put into this project is astounding... Truly remarkable.
 
UPDATE: New inside pics, now with two different mirrors involved. I uploaded a selection to my GroupDIY album.

http://twin-x.com/groupdiy/thumbnails.php?album=316

normal_Grille02.jpg


Lower ring:
normal_Grille03.jpg


Upper ring detail:
normal_Grille08.jpg


/Dave
 
Dave, those are INCREDIBLE pictures!

And they confirm that my mechanical design is correct.

I am sending these photos to the manufacturer...this, along with the tooling design, should clarify everything for them.
 
Back
Top