Inductors for passive EQs...

GroupDIY Audio Forum

Help Support GroupDIY Audio Forum:

This site may earn a commission from merchant affiliate links, including eBay, Amazon, and others.

alk509

Well-known member
Joined
Sep 3, 2004
Messages
1,207
Location
MA, US
Hey guys,

As some of you may know, I am currently in the process of designing a passive EQ. I got some pot cores and some enamel-coated wire a while ago, and today I spent a good 4 or 5 hours playing with them. So here's some observations:

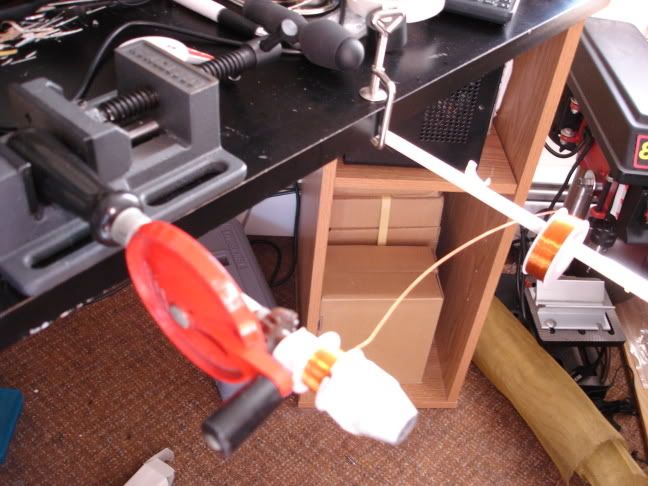
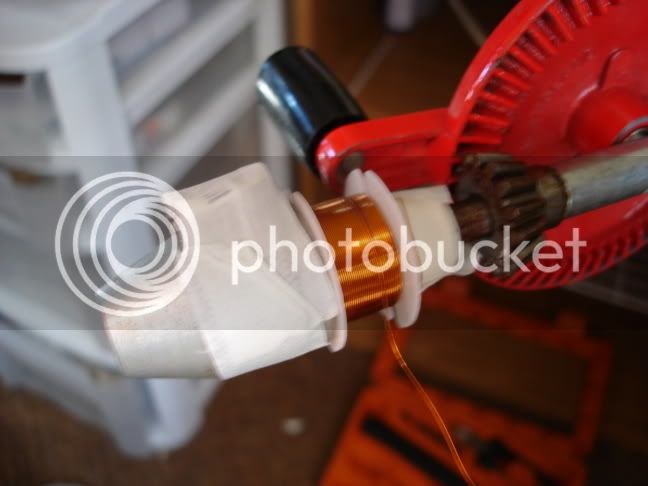
I worked on my EQ's low band inductor, which is a 1.64H little monster, with taps at 490mH and 820mH. I used a 3622 core from Amidon, which comes with a plastic bobbin, and a plastic screw and nut. I looked at the wire-gauge vs. number-of-turns chart on Amidon's website, and determined I could use 29-gauge wire, so I got some also from Amidon. It came out just right - 50 more turns or so, and the bobbin couldn't have held all the wire.

The first thing anyone winding coils on the Amidon sets needs to be aware of, is that the tightness of the plastic screw/nut changes the inductance of the coil significantly! I kept getting readings that were all over the place, and finally realized that the screw tension was to blame. It's kind of annoying, but it may actually be a good thing, since it allows you to fine tune the inductance of a coil without having to take it apart to take off turns...

For measuring inductance, I built myself a little resistance decade box and used this setup:

LMeasure.gif


The measuring process goes like this:

1. Set the signal generator to whatever frequency the inductor will work at, and set the generator's amplitude to 4Vp-p (I chose 4Vp-p because it's easy to work with. I didn't see any difference at all with voltages as low as 100mV, or as high as 10.5Vp-p, which is the limit of my signal source).
2. Put a scope probe across resistance box, and increment the resistance until signal on scope is exactly 2Vp-p.
3. Read the value from decade box - this value is the inductor's impedance at that particular frequency.
4. Measure the DCR of the inductor, and figure out the inductive reactance (XL) of the coil by re-arranging the formula Z = sqrt(DCR^2 + XL^2).
5. Finally, figure out the inductance (L) of the coil by re-arranging the formula XL=2pi*f*L.

I ended up with something like 300 turns for 490mH, an extra 115 turns to get to 820mH, and a final 150 turns to reach 1.64H. Total: ~565 turns, 12 Ohms of DCR. Not bad at all!

Damn! 4:30AM... :?

I'll keep working on this tomorrow...

Peace,
Al.
 
Thanks for the update, Al. Did you wind by hand or using a hand drill? Funny about the screw tension changing the inductance. I had a similar thing with my hand wound 2503. I could squeeze the lam stack and change the L. I wonder if the Q also varies. If I ever manage to find a decent bridge I can check this stuff out... Oh, and thanks for the Amidon link.

:guinness:
A P
 
I also found out some similar stuff when winding coils.

If one uses 2 piece cores, make sure you assemble them the same way every time i.e. mark them bfore winding.

If the tension on the 2 pieces is highr, the inductance changes - for e.g. if you squeeze them together.

Winding the wire more tightly helps.

Peter
 
They make clips that snap over those cores. You need to maintain constant tension, otherwise, your center freq will drift with age.
there is also an adhesive used beteen the halves in some applications.


Also, inductance mesurements are good for comparing two inductors that are supposed to be the same, but they are virtually useless as far as calculating resonance. I have three different bridges, and they all read completely different. The cap-inductor method used to calculate inductance is even more useless, so save yourself some time on that one.

You will need to fine tune the caps to the inductor by ear to get even increments of eq frequencies.
 
Anything that changes the geometry/spacing of the turns, coil former and core relative to one another affects the inductance, so it's not surprising to hear of your experience.
 
Yeah, I was expecting the inductance change, but what surprised me was how drastic it can be... I'm talikng differences of ~15-20% inductance with an extra turn of the screw!

Anyway, here's a picture of my coil winder:

DSC00165.jpg


Thanks to NYD for the hand-drill idea! :thumb:

I can get some pretty tight coils with this thing:

DSC00166.jpg


I'll keep measuring and winding today. I hope to have coils for a stereo EQ in a few days... :roll:

Peace,
Al.
 
Glad you made the hand-drill idea work; I still haven't done anything with mine. I'm waiting for my counter to arrive in the mail.

How are you counting the turns? In your head? Or did you rig up a counter that's not shown in the photos?
 
I'm head-counting... I'd been waiting for a new Matsushita digital counter I got for 20 bucks off eBay but it hasn't shown up and I got impatient :oops:...

Peace,
Al.
 
[quote author="AnalogPackrat"]Damn, Al. How did you get such a neat lay on that coil? Looks really pro.[/quote]

Thanks, AP! It took me a couple of tries, but eventually I got the hang of it. You gotta go slow - in fact, I was manually turning the drill at the chuck instead of using the red spinner part. That's what I put the little taped-up block at the chuck for: it helps me keep count :green:! It was ssssllllooooooowwwwwww.........

Peace,
Al.

PS: No luck on that ASM-1 front panel, AP. I've looked everywhere... :sad:.
 
[quote author="CJ"]he's gonna lose all the scatter wound mojo.[/quote]

Ha! Alright, next set of coils I'm using the spinner and going crazy. :thumb:

The only reason I wanted it neat was because of space concerns: I'm not sure I can lay all that 29-gauge wire in the bobbin if I don't lay it down neatly...

...but I'll try!

Peace,
Al.
 
actually, winding faster will give you a tighter coil, which means more turns.
try it!
tension also plays a role.

you only lose a few turns when random winding. very close to machine wound as far as getting wire on there.

so a random coil wound quick will have the same turns as a perfect coil wound slow.
 
[quote author="alk509"]
Thanks, AP! It took me a couple of tries, but eventually I got the hang of it. You gotta go slow - in fact, I was manually turning the drill at the chuck instead of using the red spinner part. That's what I put the little taped-up block at the chuck for: it helps me keep count :green:! It was ssssllllooooooowwwwwww.........[/quote]

If you look carefully at my "bobbin on a stick" winding job you'll see that I did the same thing with the marker for counting. It is definitely slow. I did 10 turns, write it down, ten turns, write it down, etc. for about an hour to get my 680 total. My trifilar-bastard-son-of-2503 definitely looks hand wound. :grin:

PS: No luck on that ASM-1 front panel, AP. I've looked everywhere... :sad:.

Thanks for looking. No sweat--I can glean some ideas from your photo. I've also been checking out the Serge pages for ideas. Love the look of those things.

A P
 
[quote author="CJ"]so a random coil wound quick will have the same turns as a perfect coil wound slow.[/quote]

Interesting... I'll try that once I get that counter - there's no way I'm head-counting at that speed!

Peace,
Al.
 
you can determine turns related to first coil by inductance.

inductance drop relates to gap distance squared, thus your large variances with screw torque.


some pot cores come with tuning slug down the middle, so you build a trident eq, 8 channel, you want each channel identical, so you buy the slugs and fine tune after channels installed, get it?
 
Well, I'll be damned! :mad:

I came back to my coil today and the inductances were all over the place again: turns out the plastic screw likes to loosen overnight! So I put a regular metal machine screw in there, which seems to hold tension pretty well and repeatably... but my inductances are still not right! :?

I guess when I wound each tap, I had a different screw tension each time - sometimes too low, sometimes too high - and now my 490mH tap looks like 430mH, and the 890mH looks like 990mH. I really wish I'd known about the damn screw tension changing the inductance when I started winding yesterday... :roll:

Well, I'm done for the day. We have 'Saw II' and 'Flightplan' due back at blockbuster tomorrow, so we gotta watch them now.

Peace,
Al.
 
Don't worry too much about the tolerance; commercial inductors have a tolerance of 20% or so, and if you're achieving 10% or less you're doing pretty well. The "820mH" inductor I used in my EQ measured at a little over 1H but it still worked fine. The shelving frequency ended up a couple of Hertz lower than nominal but you'd never hear the difference. See the curves for my EQ and you'll notice they ended up pretty close to nominal in all cases even with 20% inductors and off-the-shelf film caps. And don't forget your caps will have a certain range of tolerance, too.

For a stereo unit, I'd just make the inductors as nearly identical as I could and trim out any small differences in the L-C resonant frequencies by adjusting the cap values. Or maybe I'd just measure and if the channel matching was reasonable, just wouldn't worry about it. Remember, you're not building lab equipment for GenRad. If your 1kHz band actually centers at 1.24kHz nobody is going to notice or care. :thumb:
 
You never get a tapped inductor right the first try.
Prototype first, then adjust turns.
If you wind the first tap at 500 mh, then add turns, your 500 mh will go up slightly. I think this is beause the additional copper actually acts as core steel, thus increasing the AL of the core. But I could be blowing smoke out my ass.
 
Back
Top