Newbie builds GroupDIY 51X rack

GroupDIY Audio Forum

Help Support GroupDIY Audio Forum:

This site may earn a commission from merchant affiliate links, including eBay, Amazon, and others.
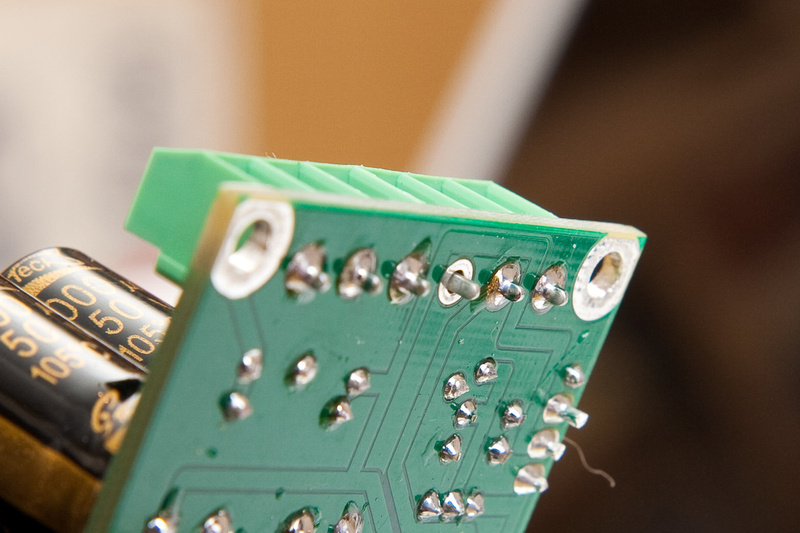
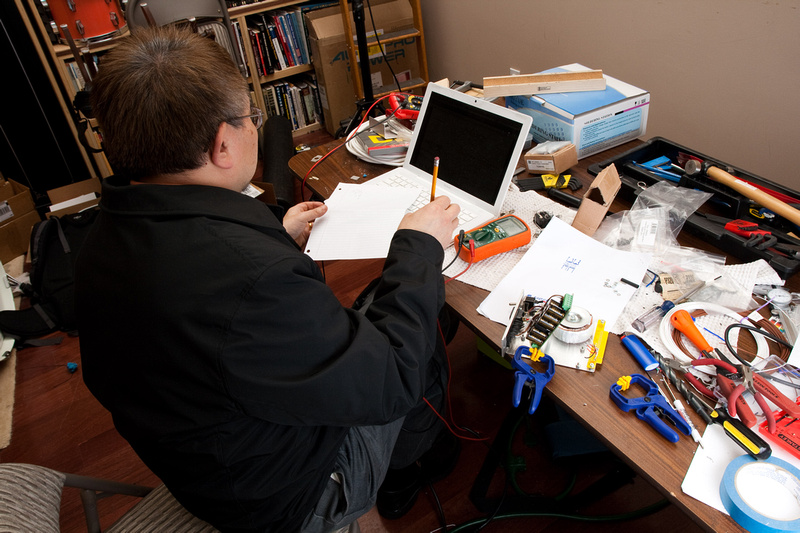
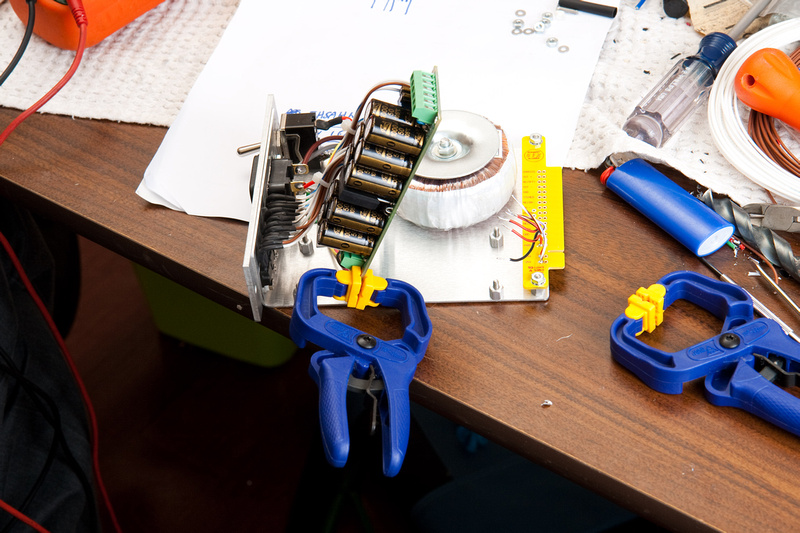
I don't think larger than 30VA would fit. . . it's already barely fitting.  Also, I don't think there's any way to run 10 modules. . . in fact, in speaking with a friend, he guesses running at full spec'd current draw and keeping the transformer at a comfortable level as well as heat in check, I may only be able to run 2 modules which is fine for the end goal of using this as portable in single space cases.  At least the v-reg heat can be easily monitored via the front face.

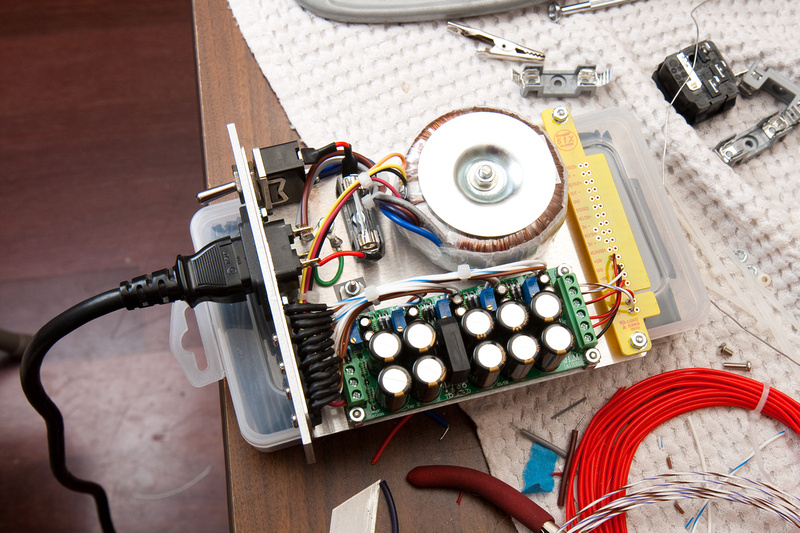
I'm hoping a friend can come up with a switcher that will be able to power the whole rack. . . that's a bit of a stretch though given my level of knowledge. . . or lack, but this powerstation will get me started right now, and lets me learn a few more things along the way.  Plus, if we're able to spec the switcher to fit in a single space.  I guess if you wanted to power more, you could do a separate supply for +-16 and +-24 but the rack would go down to 9 space.

At any rate. . . if all goes well, I should be able to power something up soon, and the real PSU kit will come in, and I'll be able to set up a permanent, robust solution.
 
Well. . . good news. . . no smoke  ;D  and the +-16V (+V1, -V1) work fine.

bad news. . . +V2 is reads 0 volts and -V2 is -18.6V but does not respond to trim pot adjustments.

48V adjusts but is only able to get up to 37.4V.

p76301878-4.jpg


Diagnostic assistance would be appreciated.
 
Nice build!

for the problems - you wrote
I'm not quite sure how much this 30VA 12V x 12V avel transformer is going to be able to power and also on the same line, what value fuse to use on the mains.  I'm guessing a 1.5 or 2 amp fuse.  My primary concern is if I have enough heat sink for the 16v rails
really 12V x 12V? how did you connect it (12 / 0 / 12 or 24 / 0)?
if 12 / 0 / 12 I wonder why even the +/- 16V are correct.
the 48V would need to be jumpered for the tripler instead of the doubler.
 
ok, yes, you will never get +/-24V with this, and the 48V would need the tripler.
I'm still wondering why the +/-16V are fine.

Looks like Joe deleted the schematics from his site,
regarding to my memories he suggested this in his AC/DC schematic:

p992080765-4.gif
 
for +/- 24V to work you will need a 2x22V or 2x25V mains transformer. Bear in mind though that then the regulators for the + / - 16V will be working hard pulling down the extra DC and they will become really hot and will need heatsinks.

I would go with a 2x15V mains transformer for +/- 16V with the Powerstation configured voltage tripler for the 48V and add the +/- 24V section later (set the extra +/- on the Powerstation for +/- 16V)

JLM has all the schematics in the "old website" section of his website, you will need the newest Acrobat Reader to open the files because they are watermarked (people and companies have been pulling his designs).
http://www.jlmaudio.com/JLM%20Power%20Supply.htm
 
argh - Apple "Vorschau" doesn't show it.

however, you can use your transformer, just look at the AC/DC schematic:
http://www.jlmaudio.com/ACDCVer2sch.pdf

but secondaries in series, not paralleled like my picture shows.
 
chunger said:
schematic still available here:
http://www.jlmaudio.com/JLM%20PowerStation%20Ver%202%20Schematic.pdf
Yes, I have seen this.
the option with connecting your transformer is not shown there.
however, in the AC/DC schematic I linked it is shown (use Adobe Reader 9).
since the rectifier sections are equal it should work with the PowerStation too.
 
Couldn't get the AC/DC schematic to work. . . must be an adobe thing as mentioned.  I called a friend to come help me diagnose the problem, and he thankfully was in town and dropped by.

p505428932-4.jpg


Prior to him showing up, I realized that my -V2 was in fact working properly.  I just had to crank down a few more turns for the trim pot to start working.  18.3 volts was the max voltage on any of the rails.  I figured it was pretty sure at that point that the secondaries on my toroid were hooked up to the powerstation in 12V configuration not 24V like I wanted.

Anyways, after some poking and measuring, my friend informed me that I was pretty much ok on my +V2 section all the way to the output screw tab.  Regulators were working right, the caps were working, everything as normal, so I took the PCB off the L-bracket to investigate.

p263630585-4.jpg


And found this on my V2 output lug  ::)  oops.

p124517794-4.jpg


I shouldn't work on this stuff so late at night I guess.

Now, the powerstation was working properly.  I just needed to figure out how to feed it 24V with the toroid that I had, so I tried this. . . as suggested by silent:arts here.  Thanks!

p470190080-4.jpg


And everything powered up good, and the voltages trimmed out to +-24V, +-16V (untouched from before) and +48V for phantom with room to spare  ;D ;D ;D

So, finally, I was able to power up a preamp on the 51X rack and hear a bass guitar through it.  Everything working as expected!  I'm very excited.

p4061917-5.jpg


I know this entire powerstation idea is a tangent to the main goal of putting together the proper GDIY PSU, but I feel the exercise was beneficial for learning and I'll be in better shape to tackle the real one after doing this.  And, I can test some modules in the meantime!  I'm not getting undue noise or hum from the system also which I was very concerned about with the tight space constraints installing the powerstation in a single card module.
 
great you got that sorted!

Depending on which modules you plan to install in your rack, you might even decide to keep the Powerstation as your main powersupply, it is a great product. With changing a couple diodes and regulators you can tweak it to give up to 3A for the +/- rails. You would need a toroid transformer that can deliver, of course.
 
chunger said:
...And found this on my V2 output lug  ::)  oops...
It's happened to all of us at one point in time or another 'Chunger!  ;)

BTW, I use a JLM Powerstation for testing modules in a 51x rack. It's in a small enclosure that takes up very little room on my bench.

I think your plug in PSU module is a pretty cool idea over all.  8)

Best, Jeff
 
Alright!  Word from jsteiger is the official PSU case and parts kits have arrived in the US, and are almost ready to ship.  I'm hoping they will be inbound quickly and I can resume my build!

My hacked "in-rack" JLM power supply has worked well for testing so far.  Even though I purchased a viable heat sink solution on Ebay, I think I'm going to build the kit version because the fabrication looks very slick and everything is integrated so nicely into the case.
 
Just got my kit from Jeff. What a fantastic packing job! I'm using this thread for my instructions, since the units don't have any other that I've found.

Hey Chunger... you get the official power supply yet from Jeff? If so, please post some excellent pictures like you did on the rack assembly. It's all I'll have to go on!

This ought to be interesting. After going 6 for 6 building Jeff's excellent VPxx modules and needing more space, I decided I'd build the rack. When I got the package unpacked, I stood back and said "whoa". This is going to be quite a project.

rackandpowersupply.jpg


'Chung...being the wild and crazy man he is, bought not just 1 but 2 complete PSU kits...and another rack! I had to look and his package is slated for a Monday delivery. I am pretty certain he will do a nice photo documentation of one of his builds. That seems to be his passion!

Gotta love it!

Go 'Chung!  ;D
 
I had a few monetary delays, but it looks like all items are en route. . . I will build and document immediately upon receipt.  Please note, I was unhappy with the fit and quality of some of the power supply components in the kit procured from ptownkid and have purchased full component kits from Jeff.  If something looks too good to be true, it often times is I guess.  So, more money spent but important lesson learned.  Even though I may not know much about electronics, what I do know is I want to do it right!  Especially on such a fundamental system in my audio chain.

More to come, and I should update my first post!

rob61 said:
Just got my kit from Jeff. What a fantastic packing job! I'm using this thread for my instructions, since the units don't have any other that I've found.

Hey Chunger... you get the official power supply yet from Jeff? If so, please post some excellent pictures like you did on the rack assembly. It's all I'll have to go on!

This ought to be interesting. After going 6 for 6 building Jeff's excellent VPxx modules and needing more space, I decided I'd build the rack. When I got the package unpacked, I stood back and said "whoa". This is going to be quite a project.
 
chunger said:
Please note, I was unhappy with the fit and quality of some of the power supply components in the kit procured from ptownkid and have purchased full component kits from Jeff.  If something looks too good to be true, it often times is I guess.  So, more money spent but important lesson learned.  Even though I may not know much about electronics, what I do know is I want to do it right!  Especially on such a fundamental system in my audio chain.

There is no question that Jeff's kits are very high quality, but please don't claim that mine was "low quality" or insinuate that the parts are "wrong" simply because you were not happy with them. My psu and many other people's built with my kit are still running happily.

That being said, i still love this thread and still think you are doing a wonderful job documenting this project.

Thanks
 
Just got my kit yesterday and I've actually made more progress than I thought I would. Got the rack assembled, the motherboard wired, and the power supply mother board mostly populated.  :) But now all my nooby questions start! Here are 5 questions.

1. Do I mount the male or female 7 pin connector in the back of the rack? (not the power supply case but the 500 module case)
maleorfemale.jpg


2. Do I use jumper wires to wire the 7 pin connector to the board? There are 6 holes in the MB and 7 pins on the connector, is there a pinout for how I connect this?

3. Does this mean the vertical row of voltage holes that could take a screw terminal on the rack mother board is unused when using the 7 pin connector?
usethese.jpg


4. What is the best way to mount the TL783 to the heatsink???  I got 5 paper insulators (if that's what they are) in the kit, do I use one in between the 783 and heat sink? Or should I forget the paper insulator (or are they thermal conducting papers????) and use a drop of Artic Silver? Do I just use a small nut/bolt to attach? I didn't find one in the parts bags. (ok, that's a bunch of subquestions counting as one :) )
TL783.jpg


5. I want to use the options with pins and jumpers. Source for them?

In case anyone wants to see the power supply board populated (except for the TL783 and heat sink) here it is.
psboard.jpg

 
rob61 said:
Just got my kit yesterday and I've actually made more progress than I thought I would. Got the rack assembled, the motherboard wired, and the power supply mother board mostly populated.  :) But now all my nooby questions start! Here are 5 questions.
Looks like you have made some nice progress so far Rob!

1. Do I mount the male or female 7 pin connector in the back of the rack? (not the power supply case but the 500 module case)
You will use the male panel mount at the back of the 511 rack. Use the female panel mount at the back of the PSU case. This way, if the PSU is on and cable is not connected to the 511 rack (or the back of the PSU case), the live connector is always female to prevent...mishaps. This should really never happen anyhow but just in case.  ;)

2. Do I use jumper wires to wire the 7 pin connector to the board? There are 6 holes in the MB and 7 pins on the connector, is there a pinout for how I connect this?
Yes, use jumper wires. Neutrik does not make a 7 pin PC mount male connector.

There are actually 8 holes on the backplane as CHASSIS is there twice. Just use one of them.

For the DC pinout, we have been recommending the standard VPR on the first 5 pins and then the higher voltage rails at the end per se.

Like this:
1. CHASSIS
2. GND
3. +16V
4. -16V
5. +48V
6. +24V
7. -24V

3. Does this mean the vertical row of voltage holes that could take a screw terminal on the rack mother board is unused when using the 7 pin connector?
Yes, and no. Unused for a connector. I just jumper wire to the backplane plated thru holes.

4. What is the best way to mount the TL783 to the heatsink???  I got 5 paper insulators (if that's what they are) in the kit, do I use one in between the 783 and heat sink? Or should I forget the paper insulator (or are they thermal conducting papers????) and use a drop of Artic Silver? Do I just use a small nut/bolt to attach? I didn't find one in the parts bags. (ok, that's a bunch of subquestions counting as one :) )
You should use the silicone insulators for all 5 reg's. Cemal has included 4 nuts, screws and insulating shoulder washers for the 4 that go to the massive heatsinks. Any #4 screw and nut will work for the 48V as the heatsink doesn't connect to the ground plane anyhow. I attach this reg to the heatsink first and then solder to the board as a unit.

5. Does ANYONE here have a picture of the whole power supply case wired up and finished showing the inside? That would be very helpful.
A few people have completed them but I have not seen a pic of a unit finished with all of our parts. Maybe someone will post a pic?

Cheers, Jeff
 
jsteiger said:
You should use the silicone insulators for all 5 reg's. Cemal has included 4 nuts, screws and insulating shoulder washers for the 4 that go to the massive heatsinks. Any #4 screw and nut will work for the 48V as the heatsink doesn't connect to the ground plane anyhow. I attach this reg to the heatsink first and then solder to the board as a unit.

I think I just made my first mistake. I mounted the 350's to the ps mother board as indicated by the printing on the circuit board. So with the heat sinks included in my kit. do I mount the 350s to the heat sinks instead of the mb, and then run extender wires from the pins to the ps mother board?

350heatsink.jpg


PS.... should I move these questions to the official GDIY51PSU Help & Support Thread instead of here? I don't want to hijack Chunger's excellent thread with all my nooby questions.


Latest posts

Back
Top